Introduction
Forget everything you think you know about making a perfect Baked Sea Bass. For twenty years, I’ve seen home cooks struggle with dry, overcooked fish. The secret isn’t a fancy sauce or a complicated technique; it’s an ancient one that creates a foolproof, personal steam oven for the fish. We’re talking about a salt crust. This method sounds intimidating, but I’m going to walk you through it step-by-step. The salt forms a hard shell, trapping every bit of moisture and flavor inside. When you crack it open, you’re left with the most succulent, perfectly seasoned fish imaginable. It doesn’t taste salty; it tastes purely of itself, enhanced by simple aromatics. This is the definitive way to prepare a whole fish, and it will change the way you think about seafood, much like our popular crispy salt and pepper fried calamari recipe has for appetizers.
Why You’ll Love This Recipe
- Unbelievably Moist Fish: The salt crust creates a sealed dome, steaming the sea bass in its own juices. It is physically impossible to get a drier result with any other baking method. It’s a built-in insurance policy against overcooking.
- Impressive Presentation, Simple Execution: Bringing a whole fish encased in a golden-brown salt crust to the table is pure culinary theater. The cracking of the crust is a memorable moment for any dinner party, yet the actual process is just mixing salt with egg whites and packing it on.
- Pure, Unadulterated Flavor: Because the salt doesn’t penetrate the skin, the meat is seasoned gently from the inside out by the aromatics you place in the cavity. You taste the clean, sweet flavor of the sea bass, not a mouthful of salt.
Ingredients List
Precision is key in a professional kitchen, and it should be in yours, too. These measurements are designed for a perfect outcome for four people.
For the Sea Bass:
- 1 whole Sea Bass (approx. 2 to 2.5 lbs): Ask your fishmonger to scale and gut the fish, but leave the head and tail on. The head and collar contain some of the most flavorful meat. Make sure the eyes are clear and the gills are bright red—signs of a fresh fish.
- 1 bunch fresh Parsley: About 1 cup, stems and all. Don’t bother chopping it.
- 1 bunch fresh Thyme: Around 8-10 sprigs.
- 1 Lemon: Thinly sliced into rounds.
- 4 cloves Garlic: Lightly smashed with the side of a knife to release their oils.
- 2 tablespoons Extra Virgin Olive Oil: For drizzling at the end. Use your best stuff here.
For the Salt Crust:
- 4 cups Coarse Kosher Salt: This is non-negotiable. Do not use fine table salt or iodized salt. The large crystals are essential for creating the right texture and preventing the crust from being overly salty. This will be about 2 pounds of salt.
- 3 large Egg Whites: These are the binder. They turn the salt into a strong, cement-like crust when baked.
- 1/3 cup Water: Just enough to bring the salt mixture to a ‘wet sand’ consistency.
Step-by-Step Instructions
Follow these steps exactly. Don’t rush the process. The details are what separate a good dish from a great one.
- Preheat and Prepare: First thing, get your oven preheating to 400°F (200°C). Line a heavy-duty baking sheet with parchment paper. This is crucial for preventing the crust from sticking and for easy cleanup.
- Prep the Fish: Rinse the sea bass under cold water, inside and out. Pat it completely dry with paper towels. I mean bone dry. Any moisture on the skin will turn the salt to mush and make it stick.
- Stuff the Cavity: Generously stuff the fish’s cavity with the parsley, thyme sprigs, lemon slices, and smashed garlic cloves. Don’t pack it too tightly; you want air to circulate.
- Make the Salt Crust: In a large bowl, combine the 4 cups of coarse kosher salt, 3 egg whites, and 1/3 cup of water. Use your hands to mix it thoroughly until it feels like damp sand, perfect for building a sandcastle. It should hold its shape when you squeeze a handful.
- Create the Base: Spread about one-third of the salt mixture onto the parchment-lined baking sheet, forming a bed for the fish that’s slightly larger than the fish itself. This base layer is just as important as the top one.
- Encase the Fish: Place the stuffed sea bass on the salt bed. Now, use the remaining salt mixture to completely cover the fish. Pack it on firmly, making sure there are no cracks or gaps. The entire fish, from head to tail, should be encased in about a 1/2-inch thick shell. Do not cover the very tip of the tail if you want to use it as a handle, but it’s not necessary.
- Bake to Perfection: Transfer the baking sheet to the preheated oven. Bake for 20-25 minutes. The crust will be hard, firm to the touch, and a very light golden brown. For a 2 lb fish, 20 minutes is usually the sweet spot. For a 2.5 lb fish, go for 25.
- Rest the Fish: This is a critical step. Remove the baking sheet from the oven and let it rest for 10 minutes. The fish is still cooking from the residual heat trapped in the salt crust. This resting period allows the juices to redistribute, ensuring a moist result for your baked sea bass.
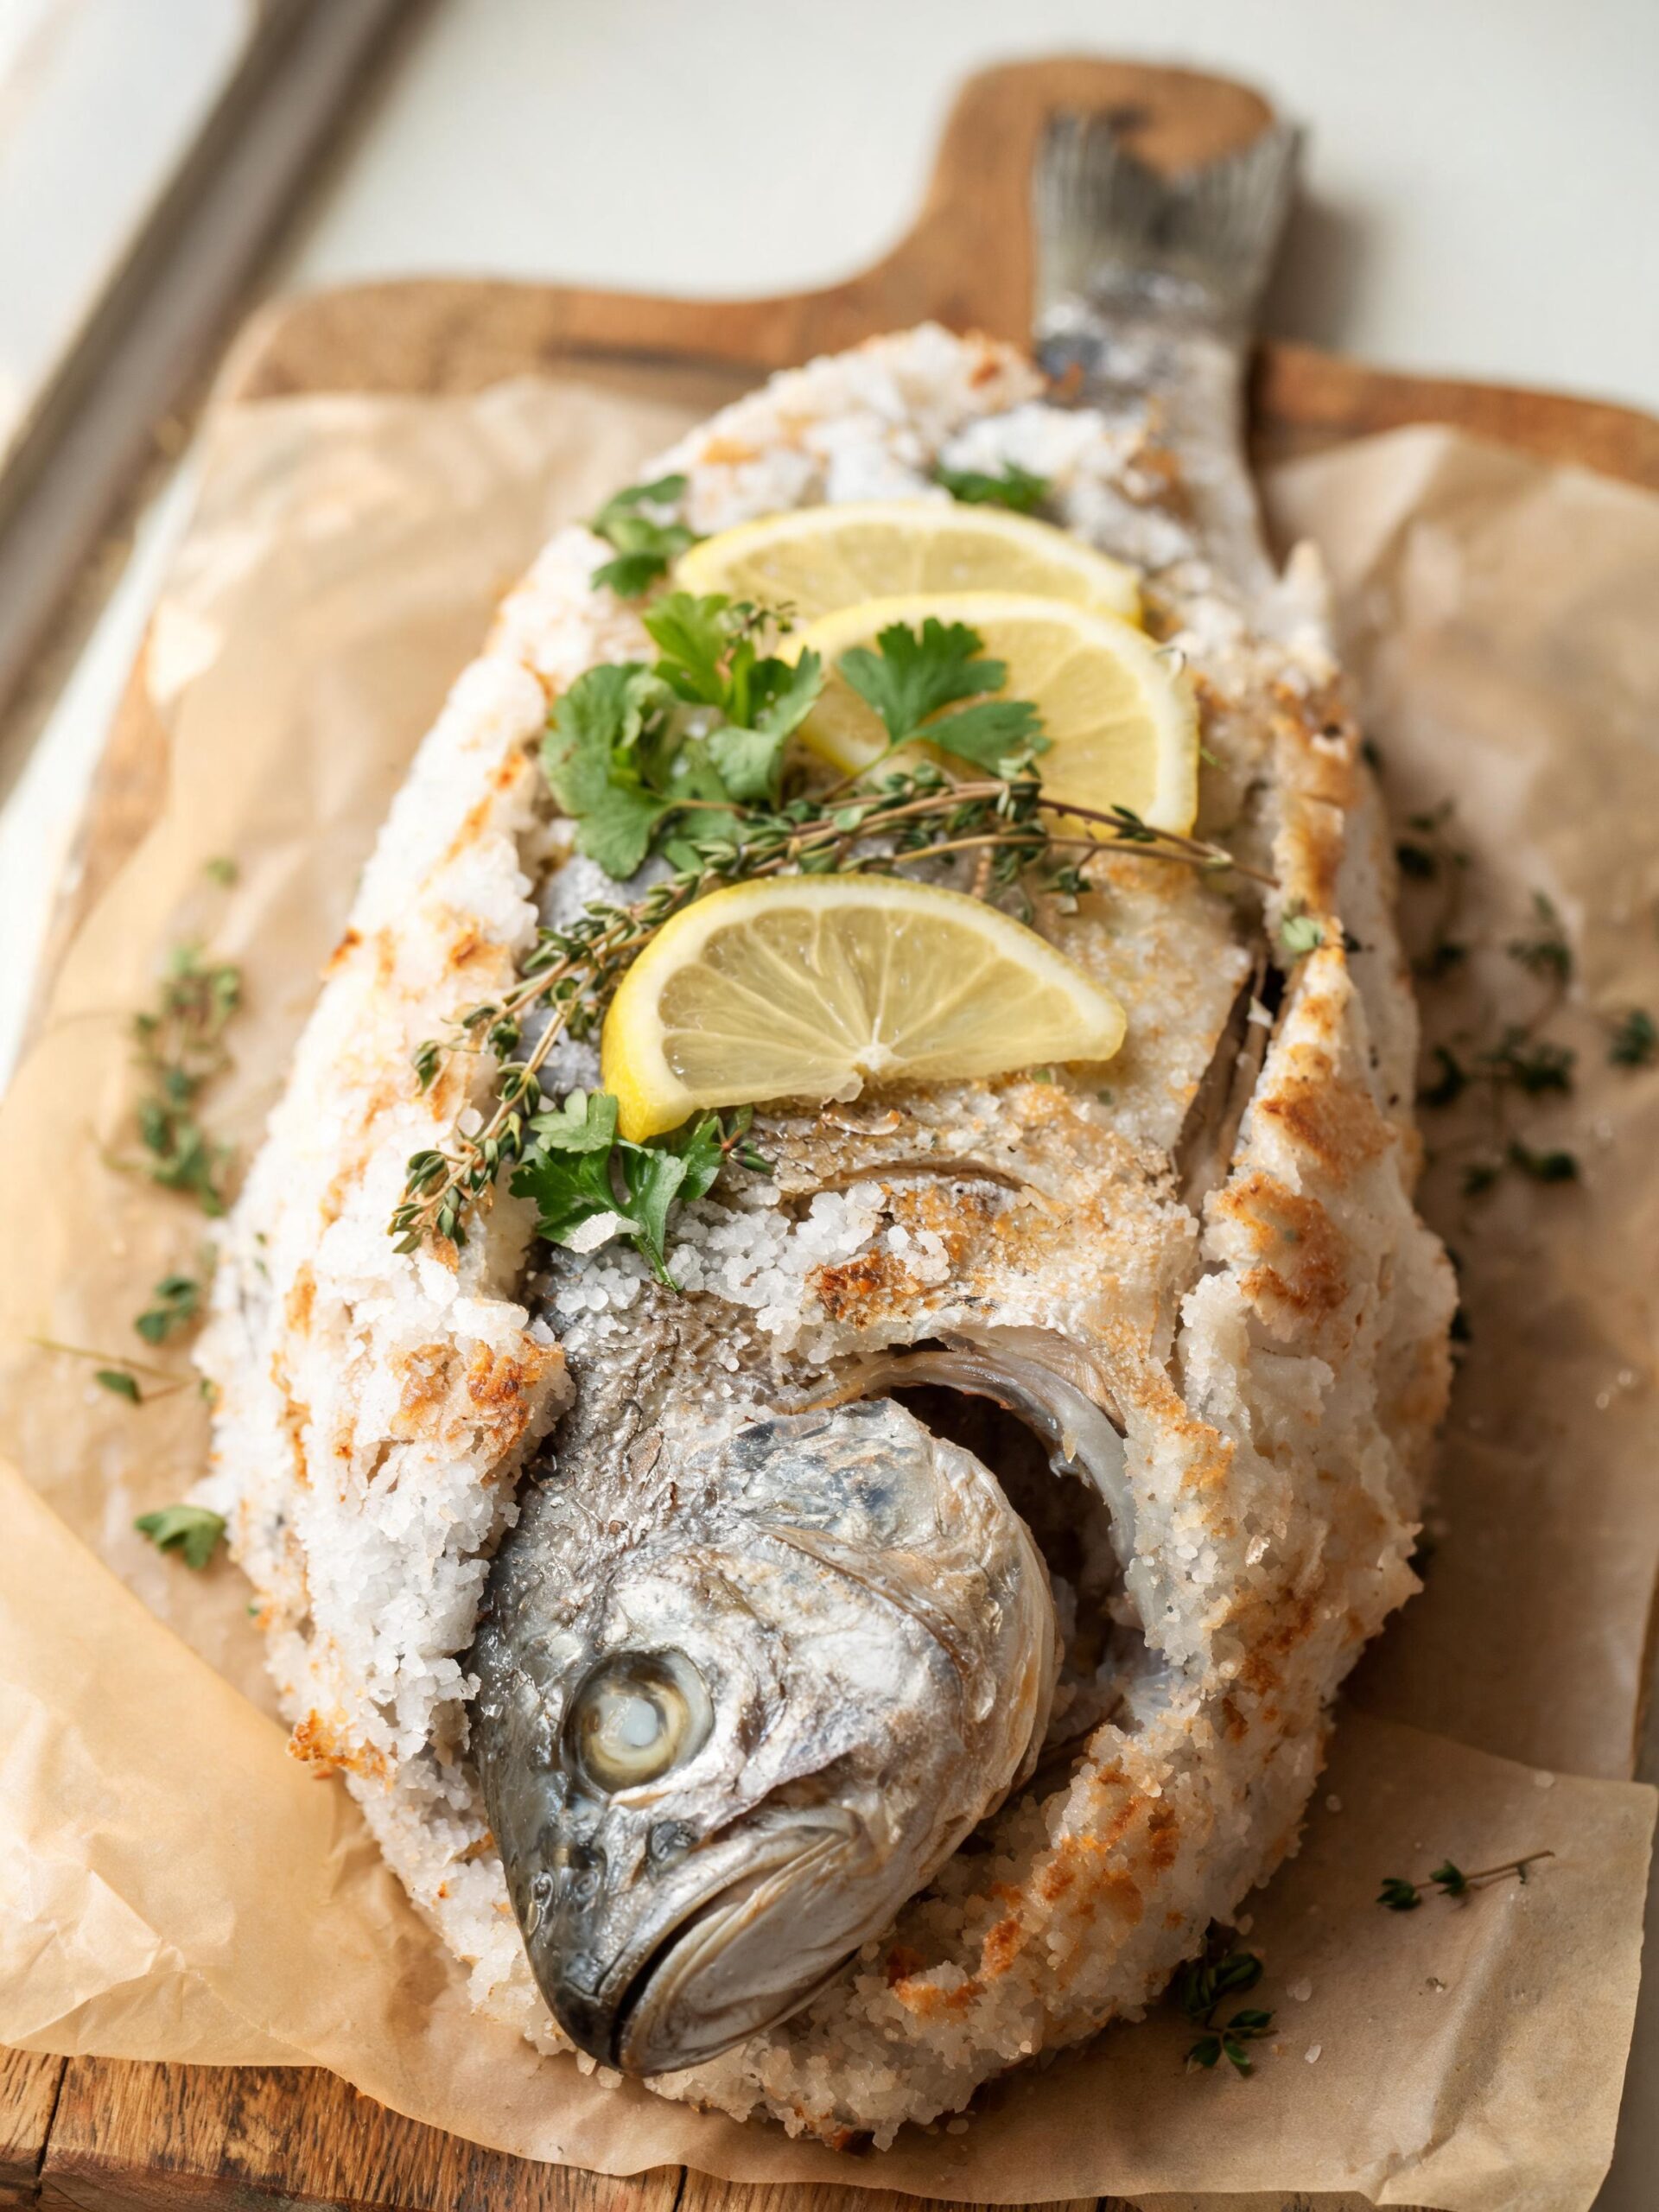
- Crack and Serve: Using the back of a heavy spoon or a small mallet, tap firmly along the side of the fish to crack the crust. You should be able to lift the top half of the salt shell off in one or two large pieces. Use a pastry brush to sweep away any loose salt crystals from the fish’s skin. Carefully peel back the skin, lift the top fillet off the bone, remove the entire skeleton, and then serve the bottom fillet. Drizzle with high-quality olive oil before serving.
Chef’s Pro Tips for Success
I can teach you old-school tricks like the cake-tester method, but in my kitchen, precision is everything. The single biggest point of failure for this dish is guesswork on doneness. That’s why I’ve ditched the old ways for a modern tool that gives me perfect results every time: a wireless meat thermometer. I insert the probe into the thickest part of the fish *before* I pack on the salt, and it sends the exact internal temperature to my phone. No poking, no guessing, no hoping—just a guaranteed, perfectly succulent fish. It’s the ultimate insurance policy for this recipe.
Stop guessing and start cooking with professional precision. Get the thermometer I trust in my own kitchen.
ThermoMaven Smart Wireless Meat Thermometer
✓ prime
We earn a commission if you make a purchase, at no additional cost to you.

After cooking thousands of fish in my career, I’ve learned a few things. These tips are the difference between a home cook and a pro.
- The Salt Choice is Everything: I specified coarse kosher salt for a reason. Its large, irregular crystals create a lighter crust with tiny air pockets. Fine-grain table salt is dense and heavy. It will absorb more moisture, turn into a solid salty brick, and its iodine content can impart a metallic taste. If you use fine salt, you risk an intensely salty, unpleasant result. Stick to coarse kosher or coarse sea salt.
- The Power of Egg Whites: Don’t think about substituting the egg whites. When heated, the proteins in the egg whites (albumin) denature and coagulate, acting as a powerful binder for the salt crystals. This creates a hard, non-porous shell that’s much stronger than a crust made with just water. This perfect seal is what traps the steam and guarantees a moist fish. A water-only crust can be crumbly and allow steam to escape.
- Master Doneness with a Cake Tester: The most reliable way to check for doneness without breaking the crust is with a thin metal cake tester or a meat skewer. About 2 minutes before you think it’s done, confidently insert the skewer through the crust and into the thickest part of the fish (behind the head). Hold it there for 5 seconds, then pull it out and immediately touch it to your upper lip or wrist. If it’s warm, the fish is perfectly cooked. If it’s cool, give it a few more minutes. If it’s screaming hot, it’s already overcooked.
- Bruise, Don’t Chop, Your Herbs: When stuffing the cavity, don’t waste time finely chopping your herbs. Simply bruise the parsley and thyme sprigs by slapping them against the cutting board or gently crushing them in your hands. This ruptures the cell walls and releases their essential oils far more effectively than chopping, infusing the steam inside the fish with intense flavor.
- The Clean Crack Technique: When it’s time to unveil the fish, don’t just smash the crust randomly. This will shower the delicate meat with salt granules. Instead, take the back of a sturdy spoon and tap firmly all around the lateral line of the fish—the ‘equator’—from the collar to the tail. This creates a clean fracture line. You can then use a knife or spatula to gently pry and lift the entire top crust off in one large piece, revealing the perfectly cooked fish below. Always have a pastry brush on hand to whisk away any stray salt before you serve.
Common Mistakes to Avoid
I’ve seen these mistakes happen time and again. Avoid them, and your dish will be flawless.
- Starting with a Wet Fish: This is the number one error. If the fish’s skin is damp, the salt layer touching it will dissolve into a salty slush instead of forming a protective barrier. This slush will cure the skin, make it stick to the crust, and can seep into the meat, making parts of the fish too salty. Pat the fish dry with paper towels until it is tacky to the touch.
- Leaving Gaps in the Crust: Think of the salt crust as a pressure cooker. Any small hole, crack, or thin spot is a steam vent. If steam escapes, moisture is lost, and the entire purpose of the technique is defeated. You’ll end up with a regular baked fish that happens to have a salty shell on it. Be meticulous when packing on the salt. Ensure an even, 1/2-inch thick layer everywhere.
- Forgetting the Rest Period: Pulling the fish from the oven and cracking it open immediately is a huge mistake. The salt shell is incredibly hot and acts like a tiny oven. The 10-minute rest allows for crucial carryover cooking to finish the job gently. It also lets the muscle fibers relax and reabsorb their juices. Skipping the rest will give you a slightly undercooked fish and a rush of lost moisture the second you cut into it.
- Over-stuffing the Cavity: It’s tempting to cram as many herbs and lemons in there as possible, but this can be counterproductive. An over-packed cavity prevents hot steam from circulating properly, leading to an unevenly cooked fish. The area along the spine might be undercooked while the thinner parts are overdone. A light, airy stuffing is all you need for a beautifully fragrant baked sea bass.
Variations and Serving Ideas
Once you’ve mastered the basic technique, you can get creative. The salt crust is a canvas for whatever flavors you want to infuse.
- Mediterranean Twist: Swap the thyme for fresh dill and oregano. Add a few sprigs of fennel fronds and thin slices of red onion inside the cavity. This variation can elevate your next baked sea bass dinner into a coastal European experience.
- Citrus Forward: Instead of just lemon, use a mix of thinly sliced Meyer lemon, blood orange, and lime. The combination of different citrus oils creates a more complex and aromatic steam.
- Asian Influence: Stuff the cavity with bruised lemongrass stalks, a few slices of ginger, whole star anise, and smashed garlic cloves. Serve the finished fish with a side of chili-garlic oil or a light soy-ginger dipping sauce.
- Tableside Filleting: For maximum dinner party drama, present the whole, crusted fish at the table. Crack the crust in front of your guests. After brushing away the salt, use a fish spatula and a large spoon to peel back the skin. Lift the entire top fillet and place it on a serving platter. Then, grasp the tail and gently lift the entire skeleton out in one piece. The bottom fillet will be perfectly intact and ready to serve.
What to Serve With
A dish this pure and elegant calls for simple, clean side dishes that won’t overpower it. While it stands beautifully on its own, if you’re planning a larger Spanish-inspired feast, it could be served alongside a showstopper like our easy authentic seafood paella. For more direct pairings, these sides pair perfectly with your Baked Sea Bass.
- Sauces: The fish is so moist it doesn’t strictly need a sauce, but a drizzle of something can be nice. A high-quality, peppery extra virgin olive oil is classic. A vibrant salsa verde, a lemon-caper brown butter sauce (beurre noisette), or a simple vinaigrette made with lemon juice, olive oil, and chopped parsley also work beautifully.
- Vegetables: Think green and fresh. Simple sautéed spinach with garlic, blanched asparagus with lemon zest, or a fennel and orange salad are excellent choices. Roasted broccolini or a simple arugula salad with shaved Parmesan also complement the fish well.
- Starches: Keep it simple. Steamed new potatoes tossed in butter and parsley, a creamy lemon-herb orzo, or even just a loaf of crusty bread to mop up the juices are all you need.
Storage and Reheating
Let’s be honest: reheated fish is a shadow of its former self. But if you have leftovers, here’s how to handle them properly.
- Storage: Do not store the fish in the salt crust. Once you’ve served what you’ll eat, flake all the remaining meat off the bones. Discard the skin, head, and skeleton. Place the flaked fish meat in an airtight container and refrigerate for up to 2 days.
- Reheating: The microwave is your enemy; it will turn the delicate flakes into rubber. The best way to reheat is gently in a non-stick skillet over low heat with a tablespoon of olive oil or a splash of broth. Toss lightly until just warmed through.
- Better Idea – Serve it Cold: Leftover flaked sea bass is fantastic cold. Use it to make a high-end fish salad with mayonnaise, celery, and herbs, or toss it with greens, capers, and a lemon vinaigrette for a next-day lunch.
FAQs (People Also Ask)
1. Is the fish incredibly salty from the crust?
Absolutely not, and this is the magic of the method. The combination of coarse salt and egg whites creates a hard, impenetrable shell. It steams the fish but does not transfer its saltiness. The fish skin acts as a final barrier. You will brush off any loose salt crystals before serving, leaving you with perfectly seasoned, not salty, fish.
2. Can I use fish fillets instead of a whole fish?
I strongly advise against it. This technique is specifically designed for the size and structure of a whole fish. Fillets are too thin and have too much exposed surface area. They would cook in minutes and absorb too much salt from the crust, resulting in a dry, salty piece of fish. Stick with a whole snapper, branzino, or of course, a beautiful baked sea bass.
3. What other types of fish work well with this method?
This salt crust method is fantastic for most whole, round fish in the 2-to-3-pound range. Whole Red Snapper is a classic choice. European sea bass (Branzino or Loup de Mer) is also excellent. Even a smaller Black Sea Bass or a Porgy would work well; you would just need to reduce the cooking time accordingly.
4. Do I really need to scale the fish if I’m not eating the skin?
Yes, 100%. While you won’t eat the skin, some scales can dislodge when you are cracking and brushing away the salt crust. The last thing you want is for tough, unpleasant scales to get mixed in with the delicate, flaky meat. It’s a small step that ensures a much better eating experience. Your fishmonger should do this for you.
5. My salt crust was wet and crumbly, not hard. What did I do wrong?
This usually comes down to one of two things: your salt-to-liquid ratio was off, or your fish was too wet. If the mixture feels like a watery slush instead of packable wet sand, you may have added too much water. Conversely, if it’s too dry and won’t hold together, you may need a tiny bit more egg white or water. The most common culprit, however, is not drying the fish properly. Excess water from the fish will leach into the salt, preventing it from forming that solid, hard crust.
Nutrition
Nutrition Facts
(Per serving. Estimates only, varies by exact ingredients used)
Conclusion
You now have the knowledge and the technique to create a truly spectacular seafood centerpiece. This isn’t just a recipe; it’s a method that builds confidence in the kitchen. The salt crust takes all the guesswork out of cooking a whole fish. Trust the process, follow the steps, and you will be rewarded with an unforgettable meal. Go make the best Baked Sea Bass of your life.

Whole Baked Sea Bass in a Salt Crust (Step-by-Step)
Ingredients
- 1 whole Sea Bass (approx. 2 to 2.5 lbs), scaled and gutted
- 1 bunch fresh Parsley
- 1 bunch fresh Thyme (about 8-10 sprigs)
- 1 Lemon, thinly sliced
- 4 cloves Garlic, smashed
- 2 tablespoons Extra Virgin Olive Oil, for serving
- 4 cups Coarse Kosher Salt
- 3 large Egg Whites
- 1/3 cup Water
Instructions
- Preheat oven to 400°F (200°C). Line a heavy-duty baking sheet with parchment paper.
- Rinse the sea bass inside and out and pat completely dry with paper towels.
- Stuff the cavity of the fish with parsley, thyme, lemon slices, and smashed garlic.
- In a large bowl, mix the coarse salt, egg whites, and water with your hands until it has the consistency of wet sand.
- Spread about a third of the salt mixture on the parchment paper to create a bed for the fish.
- Place the fish on the salt bed and cover it completely with the remaining salt mixture, packing it into a 1/2-inch thick shell. Ensure there are no gaps.
- Bake for 20-25 minutes, until the crust is hard and lightly golden.
- Remove from the oven and let it rest for 10 minutes.
- Firmly tap the crust along the side of the fish with the back of a spoon to crack it. Lift off the top crust, brush away any loose salt, and serve the fish drizzled with olive oil.