Introduction
For twenty years, I’ve worked the line in seafood restaurants up and down the coast, and I can tell you one absolute truth: nothing silences a table faster than a plate of perfectly cooked scallops. Getting that gorgeous, deep-brown crust while keeping the inside tender and sweet is a skill that separates good cooks from great ones. This recipe for Spicy Pan Seared Scallops with Chili and Herbs is my go-to for delivering that restaurant-quality experience right in your own kitchen. We’re not just cooking here; we’re applying specific techniques to guarantee success. Forget pale, rubbery scallops. We’re going to use high heat, a screaming hot pan, and a handful of fresh ingredients to create a dish that’s incredibly fast, intensely flavorful, and seriously impressive, much like a perfect crispy salt and pepper fried calamari. This isn’t just another recipe; it’s a masterclass in how to handle one of the ocean’s finest ingredients.
Why You’ll Love This Recipe
- Incredibly Fast: From fridge to plate in under 30 minutes. This is a true weeknight luxury or a last-minute showstopper for guests. The actual cooking time is less than 10 minutes.
- Restaurant-Quality Flavor: The combination of sweet scallops, a fiery kick from fresh chili, the brightness of lemon and herbs, and a rich butter pan sauce is a proven winner. It tastes complex, but it’s built on simple, powerful ingredients.
- Master a Core Technique: Learning to properly sear seafood is a fundamental kitchen skill. This recipe breaks down the critical steps—getting the scallops bone-dry, using the right pan, and managing heat—so you can nail it every single time.
Ingredients List
The quality of your ingredients is paramount here. There’s nowhere to hide in a simple dish like this. Serves 4.
For the Scallops:
- 1.5 lbs Large Sea Scallops (U-10 or U-12 size): Look for “dry-packed” scallops. These are not treated with sodium tripolyphosphate (STP), a solution that makes them absorb water. “Wet” scallops will steam and never form a good crust. Your fishmonger should know the difference. U-10 means there are “under 10” scallops per pound—these are the big, meaty ones you want.
- 1.5 tsp Kosher Salt: The larger crystals of kosher salt provide better texture and seasoning coverage than fine table salt.
- 1 tsp Black Pepper, freshly ground: Pre-ground pepper has lost most of its volatile oils. Grinding it fresh makes a world of difference.
- 2 tbsp Avocado or Grapeseed Oil: You need a neutral oil with a high smoke point. Do not use extra virgin olive oil for the initial sear; it will burn and impart a bitter taste.
For the Chili-Herb Pan Sauce:
- 4 tbsp Unsalted Butter, cold and cubed: Using unsalted butter gives you full control over the final seasoning. Keeping it cold is key for emulsifying the sauce properly at the end.
- 4 cloves Garlic, minced: Don’t use a press. A fine mince with a knife provides better flavor and is less likely to burn.
- 1 large Fresno Chili or 2 Red Thai Chilis, thinly sliced: Fresno chilis offer a moderate, fruity heat. Thai chilis are significantly hotter. Adjust to your preference. For less heat, remove the seeds and membranes.
- 1/2 cup Dry White Wine: A crisp Sauvignon Blanc or Pinot Grigio is perfect. It provides the acidity needed to deglaze the pan and build the sauce. Avoid sweet wines or oaked Chardonnay.
- 1/4 cup Fresh Parsley, finely chopped: Flat-leaf (Italian) parsley has a more robust flavor than curly parsley.
- 2 tbsp Fresh Chives, finely chopped: Adds a delicate, fresh onion flavor that complements the seafood.
- 1 tbsp Fresh Lemon Juice: Squeeze it fresh. The bottled stuff has a metallic taste. This final hit of acid brightens everything up.
Step-by-Step Instructions
Read through these steps before you begin. The cooking process is fast, so having everything prepped and ready (mise en place) is essential.
- Prep the Scallops: Gently pull off the small, tough side-muscle (the adductor muscle) from each scallop if it’s still attached. It feels like a little rectangular flap. Discard it. Place the scallops on a plate lined with several layers of paper towels. Use more paper towels to pat the tops until they are completely dry to the touch. Season both flat sides generously with kosher salt and freshly ground black pepper.
- Prep the Sauce Ingredients: Mince your garlic, slice the chili, chop the parsley and chives, and juice your lemon. Have the cold butter cubes and wine measured and ready next to the stove. Timing is everything once the pan gets hot.
- Heat the Pan: Place a 12-inch cast-iron or stainless-steel skillet over high heat. Let it get hot for a good 2-3 minutes. You want it screaming hot. Add the 2 tablespoons of avocado or grapeseed oil. The oil should shimmer and be just on the verge of smoking.
- Sear the Scallops (First Batch): Carefully place half of the scallops in the hot pan, ensuring they are not touching each other. You should hear a loud, aggressive sizzle. Do not move them. Let them sear undisturbed for 90 seconds to 2 minutes. You’ll see the edges turning golden brown and opaque. Flip them with tongs and sear the other side for another 60-90 seconds until a beautiful crust forms. Immediately remove them from the pan to a clean plate.
- Sear the Second Batch: If the pan looks dry, add another small splash of oil. Let the pan get hot again, then repeat the searing process with the remaining scallops. Remove them to the plate with the first batch.
- Build the Pan Sauce: Reduce the heat to medium. Add 2 tablespoons of the cold butter to the pan. Once it’s melted and foaming, add the minced garlic and sliced chili. Sauté for only 30-45 seconds until fragrant. Do not let the garlic brown or it will become bitter.
- Deglaze and Reduce: Pour in the white wine to deglaze the pan. It will bubble vigorously. Use a wooden spoon to scrape up all the browned bits (the fond) from the bottom of the pan—this is pure flavor. Let the wine simmer and reduce by about half, which should take 2-3 minutes.
- Finish the Sauce: Turn off the heat. Add the remaining 2 tablespoons of cold butter, the chopped parsley, chives, and fresh lemon juice to the skillet. Swirl the pan continuously until the cold butter melts and forms a creamy, emulsified sauce. Taste and adjust seasoning if needed.
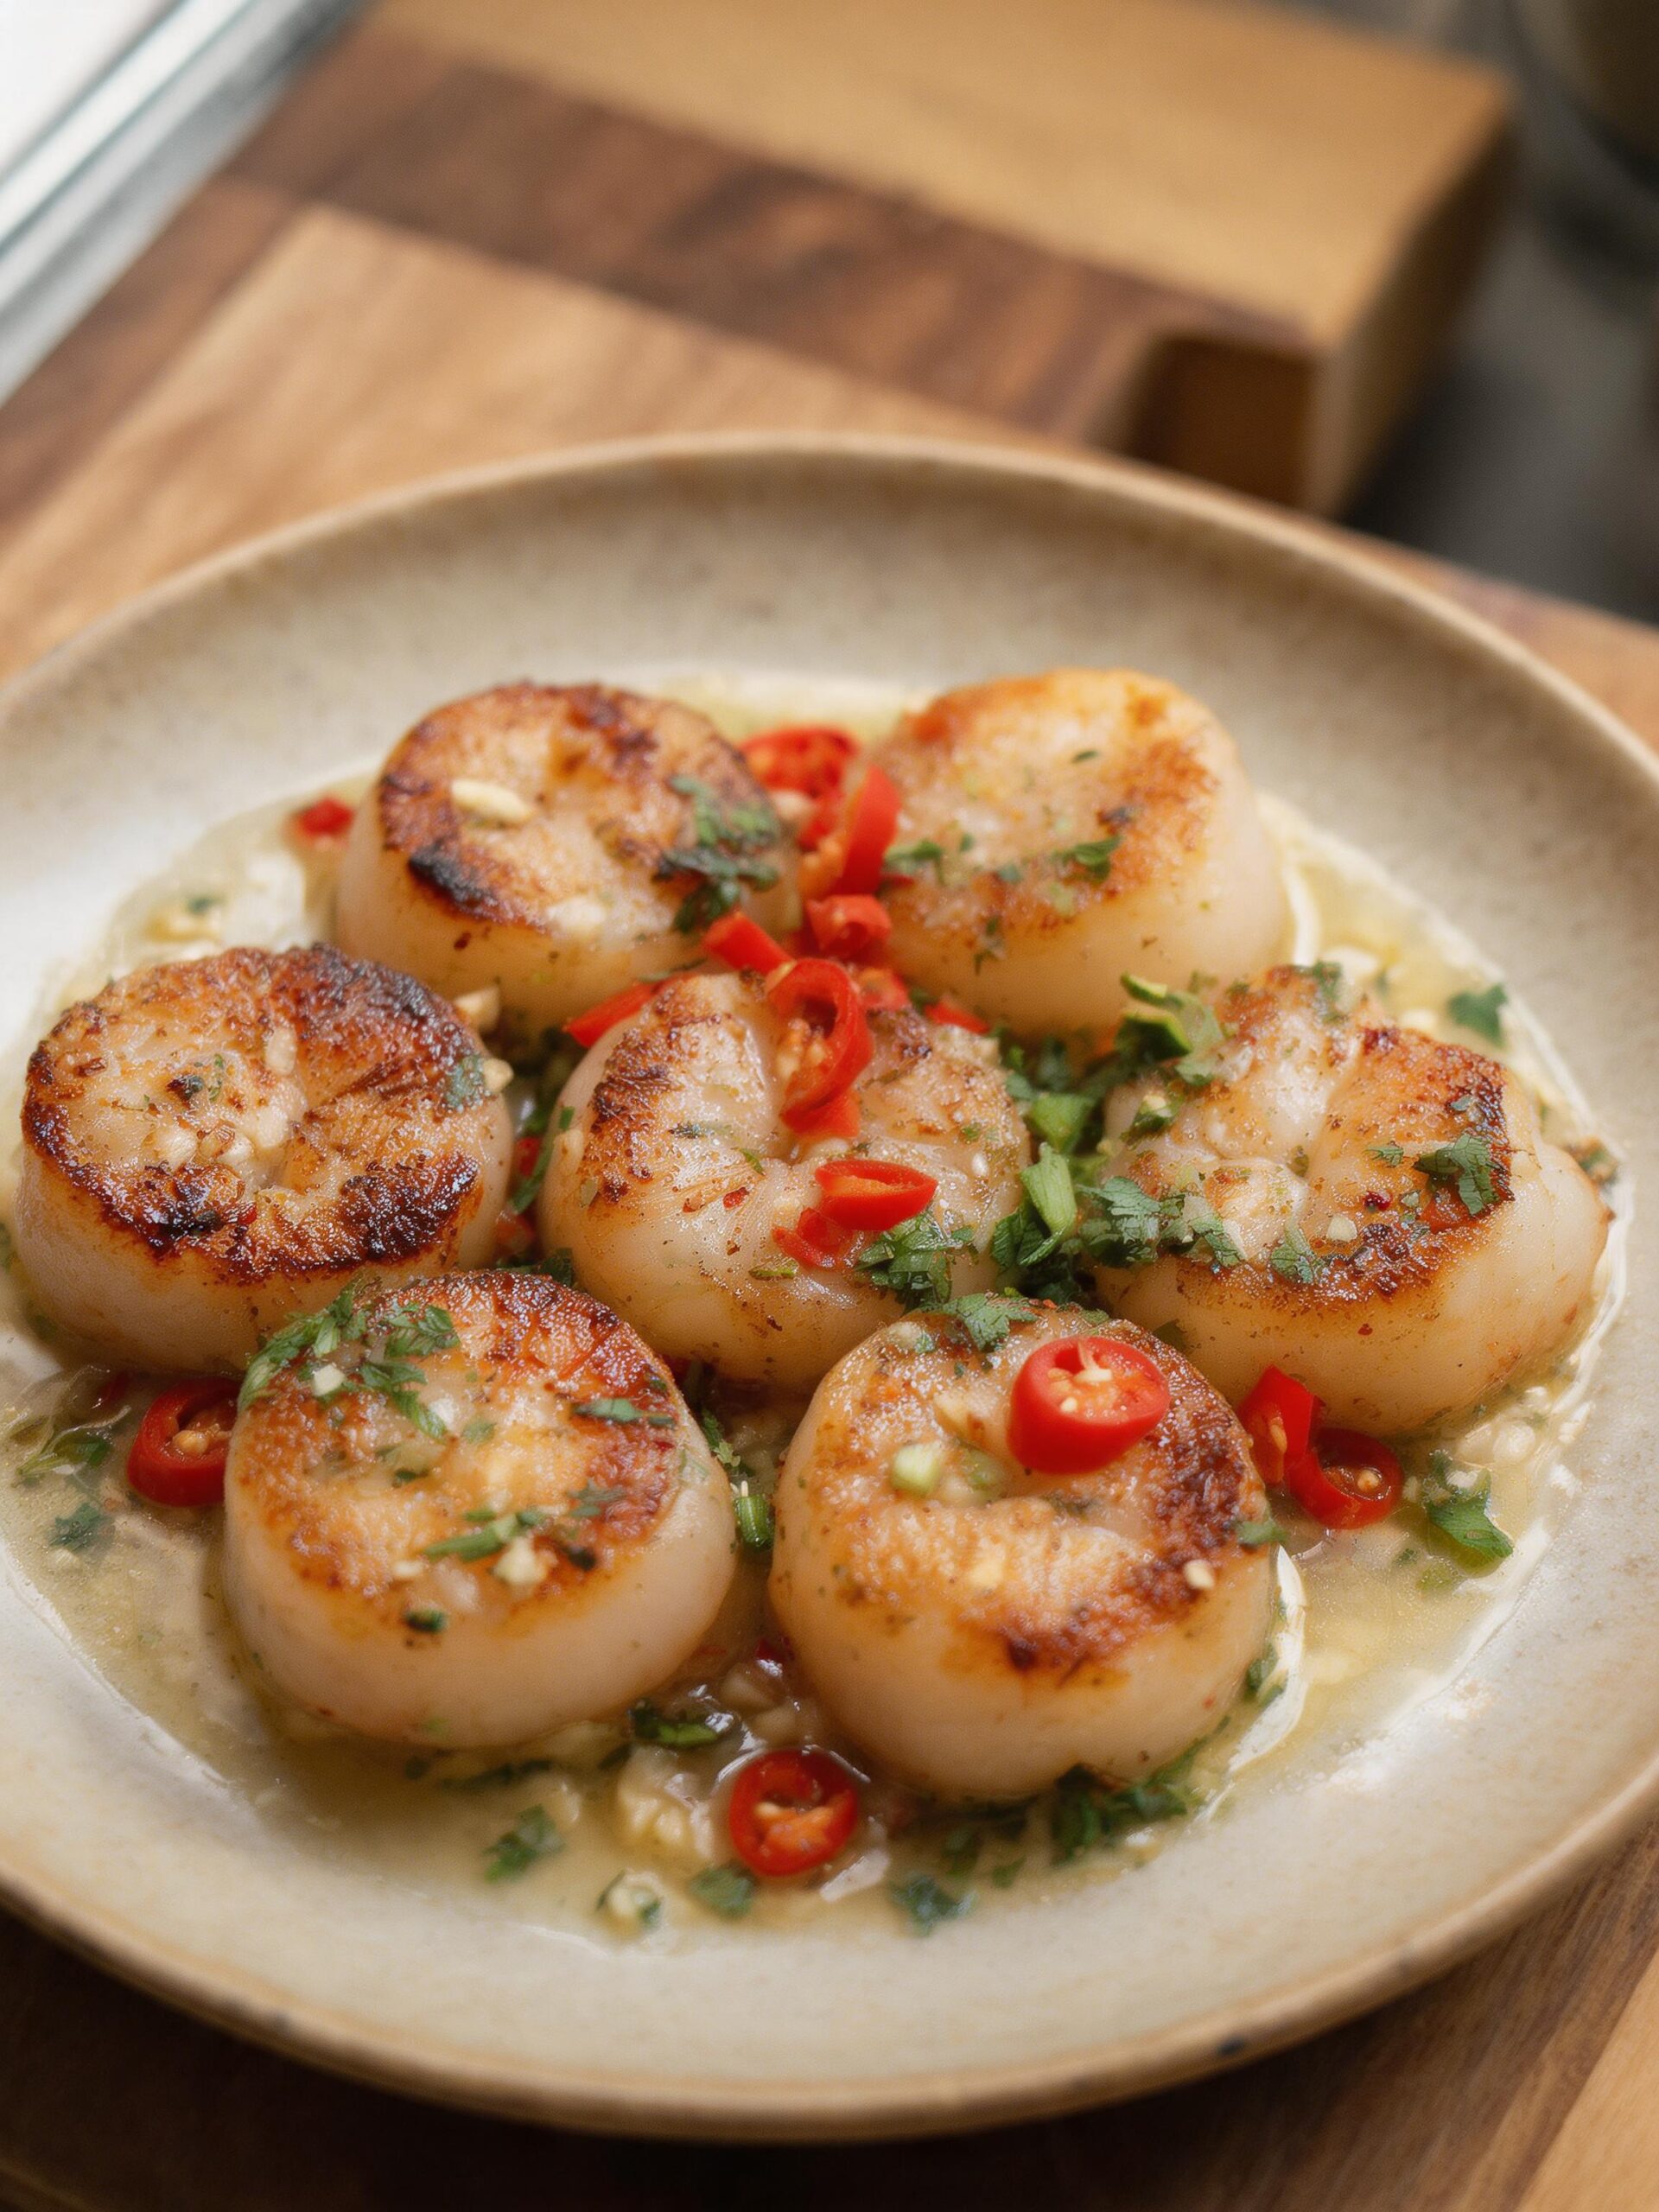
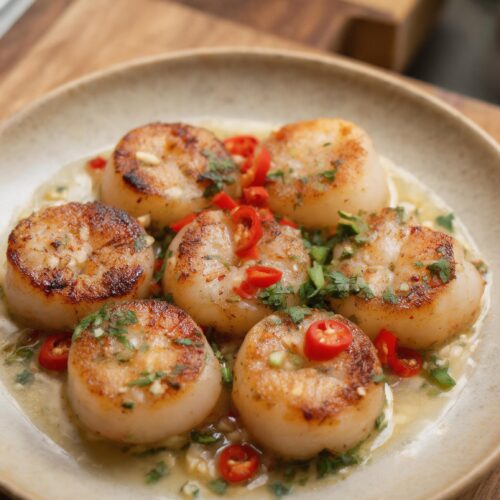
- Serve Immediately: Return the seared scallops to the pan, just to coat them in the sauce and re-warm them for about 15 seconds. Do not let them cook further. Spoon the scallops and generous amounts of the chili-herb sauce onto plates. Serve immediately.
Chef’s Pro Tips for Success
When I talk about the importance of the right pan, I’m not exaggerating. For years, my one constant companion on the line has been a heavy-duty cast-iron pan, just like this Lodge Reversible Grill/Griddle. Its ability to get brutally hot and, more importantly, *stay* hot is the secret to a perfect sear. When the scallops hit the pan, the temperature doesn’t plummet, preventing them from steaming. This is how you get that deep, even crust and develop the flavorful fond that becomes the soul of your pan sauce. It’s the single most important tool for this recipe.
If you’re ready to stop steaming your scallops and start searing them like a pro, this is the pan you need. Get yours on Amazon today!
Lodge LPGI3 Pro-Grid Cast Iron Reversible Grill/Griddle, 20-inch x 10.44-inch
✓ prime
We earn a commission if you make a purchase, at no additional cost to you.

Over the years, I’ve seen every possible mistake when it comes to scallops. Follow these five core principles, and you will get flawless results.
- The Dryness Doctrine: This is non-negotiable. Moisture is the absolute enemy of a good sear. The Maillard reaction—the chemical process that creates that delicious brown crust—cannot happen in the presence of steam. Patting with paper towels is good; for truly exceptional results, lay the prepped scallops on a paper-towel-lined plate, uncovered, in the refrigerator for 30 minutes before cooking. The cold, dry air will wick away even more surface moisture.
- The Pan and Fat Trinity: You need three things: the right pan, the right initial fat, and the right finishing fat. Your pan must be heavy and retain heat well, which is why cast-iron or heavy-bottomed stainless steel are the only real choices. Non-stick pans simply don’t get hot enough or hold heat evenly. Your initial fat must have a high smoke point (avocado, grapeseed) to handle the searing temperature. The butter comes in later, at a lower temperature, for flavor, browning, and to create the sauce.
- Respect the Space (Don’t Crowd the Pan): This is the second-biggest mistake home cooks make. When you overload a pan, the food releases too much moisture at once, which dramatically drops the pan’s temperature. Instead of searing in hot fat, the scallops begin to steam in their own liquid. For 1.5 lbs of U-10 scallops, a 12-inch skillet is ideal, and you must still work in two batches. Give them at least an inch of space between each one.
- The 90-Second Rule and Visual Cues: For large U-10 scallops, 90 seconds per side is a fantastic starting point. But don’t just cook by the clock; use your eyes. A perfectly seared scallop will have a deep, golden-brown crust that covers most of the surface. It will release easily from the pan when it’s ready to be flipped. The sides of the scallop will turn from translucent to opaque, but you should still see a sliver of translucency in the very middle. That’s the sign of a perfectly cooked, tender interior.
- Mastering the Pan Sauce (Fond and Emulsion): The brown bits left in the pan after searing are called the *fond*, and they are concentrated flavor. Deglazing with wine dissolves this fond, making it the base of your sauce. The final, critical step is the *monter au beurre*, which is French for “to mount with butter.” By turning off the heat and swirling in cold butter, you’re not just melting it; you’re creating an emulsion—a stable mixture of fat and liquid that results in a creamy, slightly thickened sauce that clings to the scallops instead of being a greasy, broken mess.
Common Mistakes to Avoid
Avoid these common pitfalls to ensure your investment in quality scallops pays off.
- Starting with Wet Scallops: This is the number one reason home cooks fail to get a good crust on their Pan Seared Scallops. If you drop a wet scallop into a hot pan, all the heat energy is immediately spent turning that surface water into steam. The scallop poaches in its own liquid, turning a pale, unappetizing grey. The result is a watery pan, zero crust, and a flabby texture.
- Overcooking to Rubber: A scallop is a delicate muscle. When overcooked, its protein fibers seize up, contract, and squeeze out all their moisture, turning the scallop from tender and sweet to tough, chewy, and rubbery. This can happen in as little as 30 extra seconds. A perfectly cooked scallop should be springy to the touch and have a slightly translucent center, like medium-rare steak. It will finish cooking from residual heat after you pull it from the pan.
- Using a Non-Stick Pan: While great for eggs, non-stick surfaces are terrible for searing. They are designed to prevent food from sticking, which also means they prevent the formation of a deep, uniform crust. Furthermore, most non-stick coatings cannot handle the high, sustained heat required for a proper sear without degrading. Use cast iron or stainless steel for a superior crust and to develop the fond necessary for a great pan sauce.
- Burning the Aromatics: Minced garlic and thinly sliced chilis have a very high surface area and burn incredibly fast, especially in a pan that was just used for high-heat searing. If you add them to the screaming hot pan right after the scallops come out, they will turn black and bitter in seconds, ruining your entire sauce. You must lower the heat to medium and let the pan cool for a moment before adding them. They only need 30-45 seconds to become fragrant, not browned.
Variations and Serving Ideas
Once you’ve mastered the basic technique, you can easily adapt this recipe. Here are a few ideas to take these spicy Pan Seared Scallops in a new direction.
- Herb Variations: Swap the parsley and chives for a different profile. Try cilantro and a squeeze of lime juice instead of lemon for a Latin-inspired flavor. For a classic French twist, use tarragon and finely minced shallots instead of garlic and chili.
- Citrus Kick: Add the zest of one lemon along with the juice at the end. The oils in the zest provide a powerful aromatic punch that complements the sweetness of the scallops beautifully. Orange or lime zest would also work well.
- Different Chilis: Control the heat by changing the chili. A finely diced jalapeño (seeds removed) will provide a milder, greener heat. A pinch of dried red pepper flakes can be used in a pinch, but they provide a sharper, less complex heat than fresh chilis.
- Creamy Sauce: After reducing the wine, add 1/4 cup of heavy cream and let it simmer for a minute before finishing with the butter and herbs. This creates a much richer, more decadent sauce that is fantastic served over pasta.
What to Serve With
The beauty of these Pan Seared Scallops lies in their rich yet bright flavor, which pairs well with a variety of sides. Don’t overcomplicate it; let the scallops be the star. For a truly show-stopping meal, however, they are an incredible addition to an easy authentic Spanish seafood paella.
- Wine Pairing: You need a wine with high acidity to cut through the richness of the butter sauce. A crisp, unoaked Sauvignon Blanc from the Loire Valley, a dry Italian Pinot Grigio, or even a dry Riesling would be perfect companions.
- Vegetables: Simple is best. Think steamed or blanched asparagus with a squeeze of lemon, sautéed spinach with garlic, or blistered green beans. A simple arugula salad with a light vinaigrette also provides a nice peppery contrast.
- Starches: These scallops and their sauce are incredible spooned over a bed of creamy Parmesan risotto or soft polenta. For a simpler option, serve them with angel hair pasta tossed in olive oil and garlic, or with a side of crusty bread for mopping up every last drop of the delicious pan sauce.
Storage and Reheating
I’ll be direct: scallops are best eaten the moment they come out of the pan. They are notoriously difficult to reheat without becoming overcooked and rubbery. If you absolutely must store leftovers, here is the best approach.
- Storage: Allow the scallops and sauce to cool slightly, then place them in an airtight container. Store in the refrigerator for no more than 24 hours. The texture will degrade beyond that.
- Reheating: Do not use a microwave. The intense, uneven heat will destroy them. The best method is to gently reheat them in a skillet over low heat. Add the scallops and sauce to the cold pan, add a splash of water or chicken broth to create some steam, and cover the pan. Heat for just 2-3 minutes, or until they are just warmed through. They will not be as good as fresh, but this method gives you the best chance of preserving some of their texture.
FAQs (People Also Ask)
Can I use frozen scallops for this recipe?
Yes, you can, but proper thawing is critical. The best method is to place the frozen scallops in a colander set over a bowl and let them thaw overnight in the refrigerator. This allows excess water to drain away. Once thawed, you must be extra diligent about patting them completely dry with paper towels, as they will have more surface moisture than fresh scallops.
What is a good non-alcoholic substitute for the white wine?
For a non-alcoholic version, you can substitute the 1/2 cup of white wine with 1/2 cup of low-sodium chicken or vegetable broth mixed with 1 tablespoon of fresh lemon juice or white wine vinegar. This mixture mimics the acidity and liquid volume needed to deglaze the pan and build the sauce effectively.
Why are my scallops always rubbery?
The single cause of rubbery scallops is overcooking. Scallops cook extremely fast. Even 30 seconds too long in the pan can be the difference between tender and tough. Aim to cook them until they are about 80-90% opaque, with a small, slightly translucent center. They will continue to cook from residual heat after you remove them from the pan, reaching a perfect final temperature on the plate.
What does “U-10” or “10/20” mean when buying scallops?
This is the standard sizing convention for scallops, indicating how many you get per pound. “U-10” means “under 10” scallops per pound, so these are the largest available (often called diver scallops). “10/20” means you will get between 10 and 20 scallops per pound. For searing, larger scallops like U-10 or U-12 are ideal because they are more forgiving and easier to cook without overcooking the center while you get a good crust.
How do I get a perfect restaurant-quality crust on my Pan Seared Scallops?
It comes down to three things: a bone-dry surface on the scallop, a very hot pan (cast iron or stainless steel), and not moving the scallop once it hits the pan. The combination of a dry surface and high, direct heat allows the Maillard reaction to occur rapidly, creating that deep golden-brown, flavorful crust you’re looking for.
Nutrition Facts
(Per serving. Estimates only, varies by exact ingredients used)
Conclusion
You now have the knowledge and the technique to create truly spectacular scallops at home. This isn’t about fancy equipment; it’s about respecting a great ingredient and controlling heat and moisture. Once you nail that perfect sear and taste that incredible chili-herb pan sauce, you’ll feel like a professional chef in your own kitchen. Give this recipe a try, and let me know how it turns out.
Spicy Pan Seared Scallops with Chili and Herbs
Ingredients
- 1.5 lbs Large Sea Scallops (U-10 or U-12 size), dry-packed
- 1.5 tsp Kosher Salt
- 1 tsp Black Pepper, freshly ground
- 2 tbsp Avocado or Grapeseed Oil
- 4 tbsp Unsalted Butter, cold and cubed
- 4 cloves Garlic, minced
- 1 large Fresno Chili or 2 Red Thai Chilis, thinly sliced
- 1/2 cup Dry White Wine (like Sauvignon Blanc)
- 1/4 cup Fresh Parsley, finely chopped
- 2 tbsp Fresh Chives, finely chopped
- 1 tbsp Fresh Lemon Juice
Instructions
- Prep Scallops: Remove the small side-muscle from each scallop. Pat the scallops completely dry with paper towels. Season both sides generously with salt and pepper.
- Mise en Place: Mince garlic, slice chili, chop herbs, and juice lemon. Have all sauce ingredients ready by the stove.
- Heat Pan: Place a 12-inch cast-iron or stainless-steel skillet over high heat. Add oil and heat until it shimmers, just before smoking.
- Sear First Batch: Carefully place half the scallops in the pan, not touching. Sear for 90-120 seconds without moving until a deep golden-brown crust forms. Flip and sear for another 60-90 seconds. Remove to a clean plate.
- Sear Second Batch: Repeat the searing process with the remaining scallops, adding a touch more oil if needed. Remove all scallops from the pan.
- Make Sauce Base: Reduce heat to medium. Add 2 tbsp of butter. When foaming, add garlic and chili and cook for 30-45 seconds until fragrant.
- Deglaze Pan: Pour in the white wine, scraping up any browned bits from the bottom of the pan. Let it simmer and reduce by half, about 2-3 minutes.
- Finish Sauce: Turn off the heat. Add the remaining 2 tbsp of cold butter, parsley, chives, and lemon juice. Swirl the pan until the butter melts into a creamy sauce.
- Combine and Serve: Return the scallops to the pan to coat with the sauce for 15 seconds. Serve immediately, spooning extra sauce over the top.