Introduction
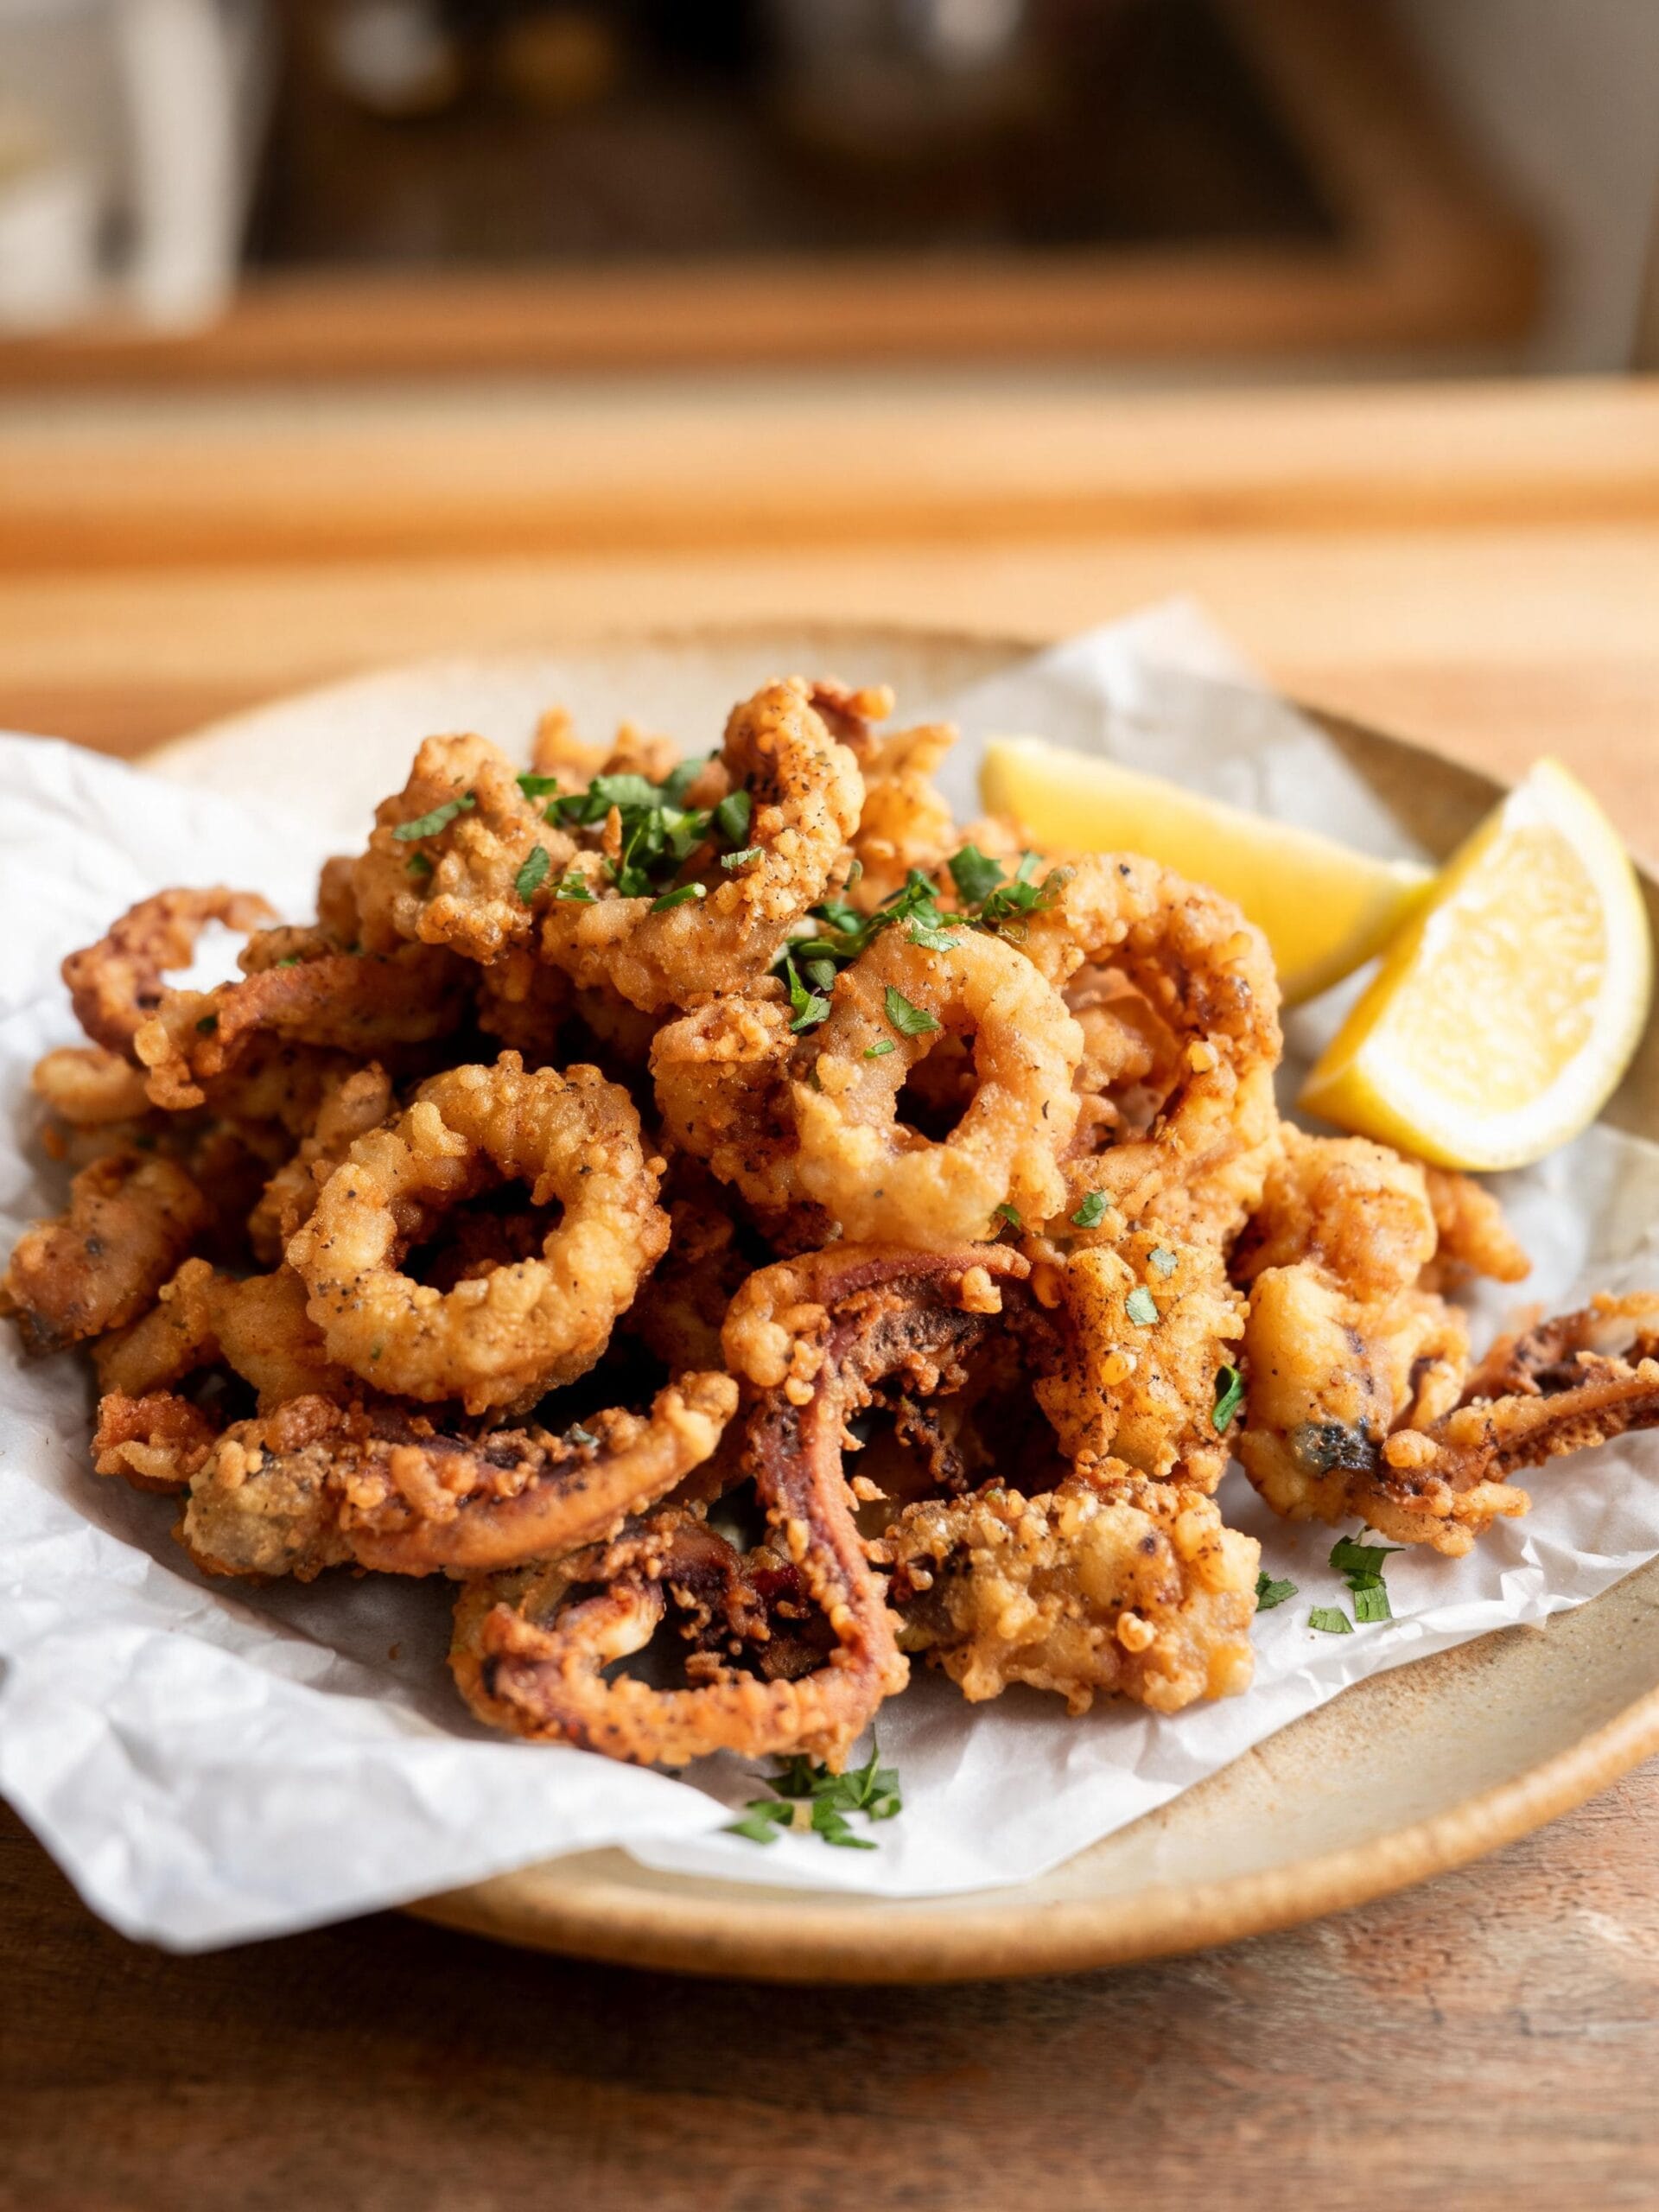
There’s nothing quite like a perfect plate of Fried Calamari. You know the kind I’m talking about: incredibly crisp on the outside, tender and sweet on the inside, with just the right hit of salt and pepper. For years, I watched countless home cooks struggle to replicate that restaurant-quality texture, often ending up with tough, greasy rings. After two decades behind the line in professional seafood kitchens, I’m here to tell you it’s not magic. It’s about technique. This recipe strips away the unnecessary complications and focuses on the core principles that deliver flawless results. We’re not just making a simple appetizer; we’re mastering a classic. Forget chewy, disappointing calamari forever. This is the only guide you’ll ever need to create a truly memorable fried seafood dish, rivaling other classics like a traditional Spanish seafood paella, right in your own kitchen.
Why You’ll Love This Recipe
- Restaurant Quality, Home Kitchen Simple: This recipe uses straightforward techniques and pantry-staple ingredients to achieve a light, crispy texture, much like our popular Panera Tuna Salad Sandwich copycat.
- Ready in Under 30 Minutes: From prepping the squid to the final sprinkle of salt, you can have a hot, delicious platter on the table in less time than it takes to decide on takeout.
- Perfectly Tender, Never Rubbery: The secret lies in a quick buttermilk soak and a fast, high-heat fry. I’ll show you exactly how to cook the calamari so it melts in your mouth.
Ingredients List
The beauty of this dish is its simplicity. We’re using a handful of quality ingredients to let the calamari shine. Precision here is key to the final texture and flavor.
For the Calamari:
- Squid (Calamari): 1 lb, cleaned, bodies cut into ½-inch rings, tentacles left whole. You can buy it pre-cleaned to save time. Both fresh and frozen (and properly thawed) work great.
- Buttermilk: 1 cup. This is non-negotiable. The slight acidity in buttermilk tenderizes the squid protein gently, ensuring it doesn’t turn into rubber bands in the hot oil.
For the Dredge:
- All-Purpose Flour: 1 cup. This forms the base of our crispy coating.
- Cornstarch: ½ cup. This is the secret to an extra-crispy, light coating that doesn’t get soggy. The combination of flour and cornstarch is a classic frying technique for a reason.
- Kosher Salt: 2 teaspoons. We season the dredge itself to build flavor from the first layer.
- Coarsely Ground Black Pepper: 1 tablespoon. The ‘pepper’ in Salt and Pepper Calamari. A coarse grind adds texture and a pungent bite.
- Garlic Powder: 1 teaspoon. Adds a subtle savory depth that complements the seafood.
For Frying and Serving:
- Neutral Frying Oil: 4-6 cups (such as canola, vegetable, or peanut oil). You need enough for the calamari to float freely, which is essential for even cooking.
- Fresh Parsley: ¼ cup, chopped, for garnish.
- Lemon Wedges: For serving. The acidity cuts through the richness of the fried coating.
Step-by-Step Instructions
Follow these steps closely. The process is fast, so having everything ready (a practice we call ‘mise en place’ in the kitchen) is crucial for success.
- Prepare the Calamari: If your squid isn’t cleaned, do that first. Cut the bodies into ½-inch thick rings. Pat the rings and tentacles completely dry with paper towels. This is a critical step; a dry surface helps the coating adhere properly.
- Buttermilk Soak: Place the dried calamari rings and tentacles in a medium bowl and pour the buttermilk over them. Stir to coat everything evenly. Let it sit for at least 15 minutes at room temperature (or up to an hour in the fridge). This tenderizes the squid.
- Prepare the Dredge and Oil: While the calamari soaks, combine the all-purpose flour, cornstarch, kosher salt, coarse black pepper, and garlic powder in a large bowl or a shallow dish. Whisk thoroughly to ensure the seasonings are evenly distributed. In a large, heavy-bottomed pot or Dutch oven, pour in the oil to a depth of at least 2-3 inches. Heat the oil over medium-high heat to 375°F (190°C). Use a cooking thermometer for accuracy.
- Dredge the Calamari: Working in batches, lift a handful of calamari from the buttermilk, allowing excess to drip off. Transfer it directly to the flour mixture. Toss generously to coat every piece completely. Shake off any excess flour; you want a thin, even coating, not a thick, pasty one.
- Fry in Batches: Carefully lower the dredged calamari into the hot oil. Do not crowd the pot. Fry for 2-3 minutes, stirring gently once or twice, until the coating is a light golden brown and crispy. The calamari will cook very quickly.
- Drain and Season: Using a spider strainer or slotted spoon, immediately remove the calamari from the oil and transfer it to a wire rack set over a baking sheet. Immediately season with another pinch of kosher salt while it’s still hot and glistening. This final seasoning is what makes it pop.
- Serve Immediately: Repeat the frying process with the remaining calamari, ensuring the oil returns to 375°F between batches. Garnish the finished platter with chopped fresh parsley and serve immediately with lemon wedges and your favorite dipping sauce.
Chef’s Pro Tips for Success
The single most important secret to perfect fried food is precise oil temperature. For years I’ve relied on an infrared thermometer to get an instant, accurate reading without fumbling with a probe. It’s the difference between greasy, soggy calamari and a flawlessly crispy, restaurant-quality batch. This is the exact tool I trust to eliminate the guesswork and get it right every single time.
ThermoPro TP420 Digital Infrared Thermometer Gun
✓ prime
Check PriceWe earn a commission if you make a purchase, at no additional cost to you.

After frying thousands of pounds of calamari, I’ve learned a few things. These are the details that separate good Fried Calamari from truly great fried calamari. And if I had to pick one single tool that makes the biggest difference, it’s a reliable thermometer. I’ve moved on from the old clip-on style to an infrared thermometer gun like the ThermoPro TP420. The ability to get an instant, accurate reading of the oil’s surface temperature with just a point and click is a game-changer. It means I can quickly check the temp between batches without fumbling with a probe, ensuring every single piece of calamari hits perfectly hot oil and comes out flawlessly crispy. This is the secret weapon for eliminating greasy results forever. Take the guesswork out of frying and see the difference for yourself.
- Master Your Oil Temperature: This is the single most important factor. If the oil is too low (below 350°F), the coating will absorb grease and become soggy. If it’s too high (above 400°F), the coating will burn before the squid is cooked. Invest in a simple deep-fry thermometer. It’s an inexpensive tool that yields priceless results. Always let the oil come back up to 375°F before adding the next batch.
- The Buttermilk Soak is Non-Negotiable: Don’t skip this. The enzymes and acidity in buttermilk break down the collagen in the squid just enough to make it perfectly tender. It also acts as a fantastic binder, helping the flour mixture stick like glue for a uniform, crispy crust. A 15-minute soak is good; 30-45 minutes is even better.
- The ‘Shake and Tap’ Dredging Method: After tossing the calamari in the flour mixture, place it in a fine-mesh sieve and give it a gentle shake and a few taps against the side of the bowl. This removes all the excess, loose flour. That excess flour is what falls off in the fryer, burns, and makes your oil bitter and dirty. A clean dredge means clean oil and a cleaner taste.
- Don’t Crowd the Pan: I can’t stress this enough. Frying is a science of heat transfer. When you add too much food to the pot at once, the oil temperature plummets dramatically. Instead of frying, the calamari begins to steam and boil in the oil, resulting in a greasy, pale coating. Fry in at least 2-3 batches for one pound of squid. Give them room to swim.
- Season While It’s Hot: The moment you pull the calamari from the fryer, it’s covered in a micro-layer of hot oil. This is the perfect adhesive. A final sprinkle of fine salt at this stage will cling to the surface perfectly. If you wait until it cools, the salt will just bounce off. This final seasoning pass is what makes the flavor truly vibrant, a technique that’s also key in our Shrimp Sausage Dirty Rice.
Common Mistakes to Avoid
I’ve seen every possible calamari catastrophe. Here are the most common pitfalls and how to steer clear of them for a perfect outcome on your first try.
- The Rubber Band Effect: This happens from overcooking. Squid muscle fibers cook in a U-shaped curve of tenderness. They are tender when raw, cook through and become tender again very quickly (2-3 minutes at high heat), but if you go past that point, they seize up and become incredibly chewy. The solution is a hot and fast fry. Pull the calamari as soon as it’s golden brown. Don’t wait for it to get dark.
- The Soggy, Greasy Mess: This is a direct result of your oil not being hot enough when the calamari goes in. The goal is to have the oil so hot that it instantly crisps the outer coating, creating a barrier that prevents oil from seeping in. If the oil is too cool, the coating slowly absorbs oil like a sponge. Use that thermometer and be patient between batches.
- Bald Spots (Breading Falls Off): This usually happens for two reasons. First, the calamari was too wet when it went into the flour. Pat it dry before the buttermilk soak. Second, you didn’t press the dredge on firmly enough or you agitated it too much in the fryer. Lay the calamari in the oil gently and only turn it once, if needed.
- The Bland Calamari Problem: Flavor needs to be built in layers. Many people forget to season the flour mixture itself. If you only salt the calamari at the end, you’re just seasoning the surface. Seasoning the dredge ensures every bite, from the crust to the squid itself, is flavorful. Remember: season the dredge, then season the final product.
Variations and Serving Ideas
While classic salt and pepper is fantastic, this recipe is a perfect canvas for creativity. Once you’ve mastered the basic technique for Fried Calamari, try these variations.
- Spicy Cajun Calamari: Add 2 tablespoons of your favorite Cajun or Creole seasoning blend to the flour mixture. Serve with a spicy remoulade sauce (mayonnaise, capers, Creole mustard, hot sauce, and lemon juice). This adds a fantastic Louisiana-style kick.
- Italian-Style Calamari: Add 1 teaspoon of dried oregano and 2 tablespoons of grated Parmesan cheese to the flour dredge. Serve with a side of warm, high-quality marinara sauce for dipping. This is the classic version you’ll find in many Italian-American restaurants.
- Asian-Inspired Calamari: Instead of salt and pepper, season the hot calamari with a sprinkle of togarashi (a Japanese seven-spice blend) and serve with a sweet chili sauce or a wasabi-mayonnaise dip. Garnish with cilantro and sliced scallions.
- Calamari Po’ Boy: Pile the hot, crispy calamari onto a toasted French baguette that’s been slathered with remoulade. Top with shredded lettuce and sliced tomatoes for an incredible seafood sandwich.
What to Serve With
A great plate of fried calamari can be a meal in itself, but it truly shines with the right accompaniments. Think about balancing the richness of the fried food with acidity and freshness.
- Dipping Sauces: The classic choice is a simple, warm marinara sauce. However, a creamy and zesty garlic aioli is my personal favorite. To make a quick aioli, mix 1 cup of mayonnaise with 2 minced garlic cloves, the juice of half a lemon, and a pinch of salt. A spicy chipotle mayo also works wonderfully.
- Side Dishes: You can’t go wrong with a pile of shoestring French fries for a ‘Calamari and Chips’ experience. For a lighter pairing, a simple arugula salad tossed with a sharp lemon vinaigrette provides a fresh, peppery contrast that cuts through the richness.
- Drink Pairings: A crisp, acidic white wine like a Sauvignon Blanc, Pinot Grigio, or even a dry Prosecco is a perfect match. The acidity cleanses the palate between bites. For beer lovers, a light pilsner or a crisp lager works beautifully without overpowering the delicate flavor of the calamari.
Storage and Reheating
Let’s be honest: Fried Calamari is at its absolute peak the moment it comes out of the fryer. However, if you have leftovers, here is the proper way to handle them to preserve as much of the original texture as possible.
- Storage: Allow the calamari to cool completely to room temperature. Storing it while warm will create steam and make it soggy. Place it in an airtight container lined with a paper towel to absorb any excess moisture or grease. Store in the refrigerator for up to 2 days.
- Reheating: The microwave is the enemy of crispy food. Do not use it. The best method is an air fryer. Preheat your air fryer to 375°F (190°C) and heat the calamari for 3-4 minutes, or until warmed through and re-crisped. The second-best method is an oven. Spread the calamari in a single layer on a baking sheet and bake at 400°F (200°C) for 5-7 minutes.
FAQs (People Also Ask)
1. Can I use frozen squid for this recipe?
Absolutely. In many places, especially those far from the coast, the ‘fresh’ squid you see at the seafood counter was previously frozen anyway. High-quality frozen squid is flash-frozen on the boat, preserving its texture and flavor perfectly. Just make sure to thaw it completely and safely—either overnight in the refrigerator or under cold running water—and pat it extremely dry before you begin.2. My breading keeps falling off. What am I doing wrong?
This is the most common issue. The culprit is usually moisture. First, ensure the calamari is patted very dry before the buttermilk soak. Second, let the excess buttermilk drip off before dredging. Third, press the flour mixture onto the calamari firmly to create a good bond. Finally, be gentle when placing it in the oil and don’t move it around too much while it fries.
3. Can I make fried calamari in an air fryer?
You can make a version of it, but it won’t be the same as deep-frying. To adapt, follow the recipe through the dredging step. Then, spray the dredged calamari generously with cooking oil spray. Place it in a single layer in the air fryer basket, preheated to 400°F (200°C). Cook for about 8-10 minutes, flipping halfway through, until golden and crispy. It will be lighter but less decadent than the deep-fried original.
4. What is the best type of oil for frying seafood?
You need a neutral oil with a high smoke point (the temperature at which it begins to burn and smoke). Excellent choices include peanut oil, canola oil, vegetable oil, or safflower oil. Avoid oils with low smoke points like extra virgin olive oil, as they will burn and impart a bitter taste to your food.
5. Why does my calamari get tough and rubbery?
This is purely a matter of cooking time. Squid muscle cooks very quickly, much like other delicate seafood such as oven-baked trout, which can also become dry if overcooked. You have a very short window of about 2-3 minutes in hot oil (375°F) where it becomes cooked through and perfectly tender. If you cook it for longer, the proteins constrict and squeeze out all their moisture, resulting in that dreaded rubbery texture. Cook it hot, cook it fast, and pull it out as soon as it’s golden.
Nutrition Facts
(Per serving. Estimates only, varies by exact ingredients used)
Conclusion
Making exceptional fried calamari at home isn’t about having fancy equipment; it’s about understanding the fundamentals of good cooking. With this recipe and these techniques, you’re now equipped to create a dish that will rival any seafood shack or upscale restaurant. So grab some squid, heat up that oil, and get ready to enjoy one of the most satisfying seafood appetizers there is. I hope you enjoy making—and eating—it as much as I do. If you try this recipe, please leave a comment below!
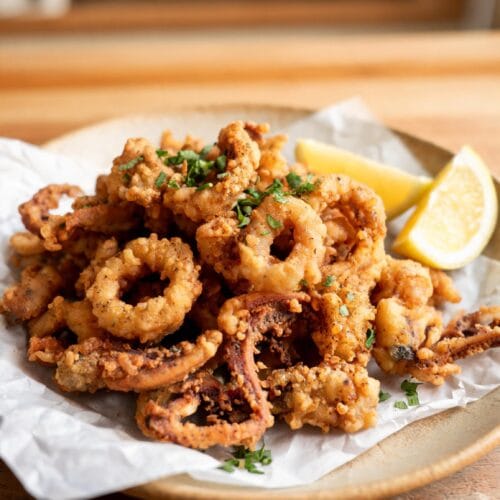
Crispy Salt and Pepper Fried Calamari Recipe
Ingredients
- 1 lb squid (calamari), cleaned, bodies cut into ½-inch rings, tentacles left whole
- 1 cup buttermilk
- 1 cup all-purpose flour
- ½ cup cornstarch
- 2 teaspoons Kosher salt, plus more for finishing
- 1 tablespoon coarsely ground black pepper
- 1 teaspoon garlic powder
- 4-6 cups neutral frying oil (canola, vegetable, or peanut)
- ¼ cup fresh parsley, chopped, for garnish
- Lemon wedges, for serving
Instructions
- Pat calamari rings and tentacles completely dry with paper towels.
- Place the dried calamari in a bowl, cover with buttermilk, and let it soak for at least 15 minutes.
- In a separate shallow dish, whisk together the flour, cornstarch, 2 tsp kosher salt, black pepper, and garlic powder.
- Heat 2-3 inches of oil in a heavy-bottomed pot to 375°F (190°C).
- Working in batches, lift calamari from the buttermilk, dredge thoroughly in the flour mixture, and shake off any excess.
- Carefully fry the calamari for 2-3 minutes per batch, until light golden brown and crispy. Do not overcrowd the pot.
- Remove with a slotted spoon to a wire rack and immediately season with a pinch of salt.
- Garnish with fresh parsley and serve immediately with lemon wedges.